第6章 多 Agent + ReAct架构,SpringAi迈入Agent新时代
6-1 SpringAl 1.0, 1.1和 2.0
SpringAl版本:
1.0正式版(2025.5)
- 与AI模型交互接口(ChatClient)
- 向量检索生成(RAG)。后续版本更新,学习最新的
- 对话记忆,后续版本会增强
- 支持MCP
1.1正式版(2025.11)
- MCP开箱即用:基于注解、OAuth2、0.10版本
- 提示词缓存(多种缓存策略)
- 原生支持谷歌Gemini2.0Flash
- 向量检索生成更高效(RAG)
- 对话记忆存储方案增加
2.0.0-M1(2025.12)
- 只支持Java21,SpringBoot4.0以上版本
- 基于Redis的对话记忆组件:检索增强、性能调优
- Redis向量检索生成升级
- OpenAI原生SDK接入
- 谷歌Gemini思考深度调节
6-2 SpringBoot整合SpringAi Alibaba
SpringAI 1.0的整合依赖
为什么使用SpringAi Alibaba, 代替SpringAi
  1. SpringAi Alibaba 是基于 SpringAi,SpringAi Alibaba在SpringAi的基础做了优化,
        2.
    a.  更好集成国内模型:DeepSeek, Qwen3

  b.  和阿里云百炼模型平台, 有深度的集成

  1. SpringAi可以看作底层的Ai应用开发框架,S pringAi Alibaba 倾向于Ai智能体(Ai Agent)的开发框架
        2.        a. 智能体的编排工作流
            b.  适配多个智能体协作场景
            c.  和阿里云的智能体应用平台有深度集成
          d.  提供了RAG知识库的解决方案
            e.  提供了分布式的MCP的方案
通过spring-ai-alibaba-starter-dashscope与springAi整合
    <properties>
        <maven.compiler.source>17</maven.compiler.source>
        <maven.compiler.target>17</maven.compiler.target>
        <project.build.sourceEncoding>UTF-8</project.build.sourceEncoding>
        <!--    最低版本必须是 > 1.0.0-m6 ,  因为从1.0.0-m6开始才集成MCP   -->
        <!--  SpringAi Alibaba 的版本号      -->
        <spring-ai-alibaba.version>1.0.0.2</spring-ai-alibaba.version>
        <!-- SpringBoot 版本号 -->
        <springboot.version>3.4.5</springboot.version>
        <!--  SpringAi 的版本号      -->
        <spring-ai.version>1.0.0</spring-ai.version>
    </properties>
    <!--  =============
      bom依赖,起到的是版本的统一管理
      注意:bom依赖必须放在 <dependencyManagement>标签内
   ==============-->
    <dependencyManagement>
        <dependencies>
            <!--   SpringAi Alibaba 的版本管理        -->
            <dependency>
                <groupId>com.alibaba.cloud.ai</groupId>
                <artifactId>spring-ai-alibaba-bom</artifactId>
                <version>${spring-ai-alibaba.version}</version>
                <type>pom</type>
                <scope>import</scope>
            </dependency>
            <!--   SpringAi 的版本管理         -->
            <dependency>
                <groupId>org.springframework.ai</groupId>
                <artifactId>spring-ai-bom</artifactId>
                <version>${spring-ai.version}</version>
                <type>pom</type>
                <scope>import</scope>
            </dependency>
        </dependencies>
    </dependencyManagement>
    <dependencies>
<!--
     整合SpringBoot 的 2个坑:
     1. 必须要引入 spring-boot-starter-web
     2. spring-boot-starter-web 引入顺序必须在 spring-ai-alibaba-starter-dashscope之前
     -->
        <dependency>
            <groupId>org.springframework.boot</groupId>
            <artifactId>spring-boot-starter-web</artifactId>
            <version>${springboot.version}</version>
        </dependency>
        <!--  SpringAi Alibaba 1.0.0.2版本整合SpringBoot      -->
        <dependency>
            <groupId>com.alibaba.cloud.ai</groupId>
            <!-- 阿里百炼大模型服务平台 -->
            <artifactId>spring-ai-alibaba-starter-dashscope</artifactId>
        </dependency>
    <!-- MCP的底层依赖   -->
        <dependency>
            <groupId>org.springframework.ai</groupId>
            <artifactId>spring-ai-mcp</artifactId>
        </dependency>
</dependencies>配置文件
logging:   # SpringBoot日志配置
  level:
    # ChatClient 监控日志的等级
    org.springframework.ai.chat.client.advisor: debug
spring:
  ai:
    dashscope:
      # 阿里百炼大模型服务平台 API-Key申请文档
      # https://help.aliyun.com/zh/model-studio/get-api-key
      api-key: 你的ApiKey
      chat:
        options:
model: deepseek-r1 # 指定DeepSeek的模型名称5-3 和大模型互动的中枢:ChatModel对象
SpringBoot 注入方式:
@Autowired 或 @Resource
构造方法的参数进行注入
@RestController
public class ChatController {

      private final ChatModel chatModel;
      public ChatController(ChatModel chatModel) {
         //  ChatModel对象随着SpringBoot自动装配机制进行了初始化
        this.chatModel = chatModel;
      }

    @GetMapping("/simple/chat")
    public String simpleChat() {
        String res = "";
        //用户输入
        String message = "在咖啡馆里,想要杯星巴克";
        UserMessage userMessage = new UserMessage(message);
        //提示词(Prompt)
        Prompt prompt = new Prompt(userMessage);
        //调用大模型并获取响应(文本响应)
        ChatResponse chatResponse =  chatModel.call(prompt);
        if(chatResponse.getResult() != null) {
            if(chatResponse.getResult().getOutput() != null ) {
                res = chatResponse.getResult().getOutput().getText();
            }
        }
        return res;
    }
}6-4 和大模型互动的窗口:ChatClient对象
ChatClient是对ChatModel的封装
Java 以new方式创建对象的缺点:
- 如果对象有很多属性,需要一个一个属性进行设置, 代码看上去很丑陋;例如User对象,setAge(), setBirthday(), setName()
- setter方式进行属性的设置,在高并发, 多线程的环境下,造成对象状态的不一致。 例如User对象,线程A执行setAge(),线程B执行了setBirthday() 正常情况下,User对象的age属性和birthday属性是应该更新到新值, 但是在高并发环境下,如果没有对线程A和线程B进行线程保护, User对象的age属性和birthday属性有可能,值没有进行更新,
- 如果对象有很多属性,有些属性值可能Null,这种在一些业务逻辑,不注意处理的话会报错。Java 以Builder模式创建对象的优点
- Builder模式并不是直接创建对象,先创建Builder对象然后build()创建不可变的对象,所有的属性的都是final,这样子保证了对象初始状态的一致性,而传统的New方式创建对象的属性是可以更改的
- Builder模式进行属性设置,是通过链式调用,链式调用设置属性,还是要注意在高并发环境下,线程的保护
- 属性的默认值没有Null
@RestController
public class ChatController {

      private final ChatClient chatClient;
      public ChatController(ChatModel chatModel,ChatClient.Builder chatClient,
            ToolCallbackProvider toolCallbackProvider) {
        this.chatModel = chatModel;
        this.chatClient = chatClient.defaultToolCallbacks(toolCallbackProvider).build();
      }

        @GetMapping("/simple/chatclient")
        public String simpleChatByChatClient() {
            String res = "";
            //构建prompt -> 发送到大模型 -> 获取大模型返回
            //用户输入
            String message = "在咖啡馆里,想要杯星巴克";
            //链式调用
            res = this.chatClient
                    .prompt(message) //构建prompt
                    .call()  //发送到大模型
                    .content() //获取大模型文本返回
            ;
        return res;
    }
}6-5 ChatClient流式响应获取数据(SSE)
和大模型以流式响应的方式进行对话的前提条件:

1. SpringBoot Api 和 大模型应该是保持长连接

2. 大模型能够主动的向SpringBoot Api发送数据

SpringAi 提供了 SSE协议 能方便实现和大模型以流式响应的方式进行对话

SSE 协议
1. 基于HTTP的长连接技术
2. 客户端发送普通HTTP请求建立SSE长连接
服务端以流式数据向客户端进行推送
3. 客户端在请求头设置Accept: text/event-stream,
告诉服务端需要建立SSE长连接
4. 单向通信,SSE长连接建立之后
客户端只负责消息的接收,客户端不能发送消息给服务端
服务端只负责消息的推送,

Flux技术:

Java专门处理异步,流式的数据序列,数据流的容器,
1. 接收Ai发送过来的逐字内容
2. 逐段的发送数据

Flux类是Java响应式编程核心类
WebFlux 引入了 Flux类,WebFlux也是响应式编程。

响应式编程:
不会让线程傻傻的等待请求的处理,
而是对系统说,我这个线程先去做其他的东西,
你把请求处理的准备工作处理好,告诉我这个线程,这个线程就会回来处理这个请求。
目标:用最少得线程,去处理大量的请求工作

SpringBoot基于响应式编程模型 处理SSE数据流,
因为SSE“持续的数据流”可以看做是响应式的事件流,
响应式编程框架,提供了能够高效处理响应式的事件流的能力
所以,SpringBoot基于响应式编程框架,也就是WebFlux框架,和SSE协议,是天然契合~@RestController
public class StreamController {
private final ChatClient chatClient;
public StreamController(ChatClient.Builder chatClient) {
this.chatClient = chatClient.build();
}
@GetMapping(value = "/simple/stream",produces = MediaType.TEXT_EVENT_STREAM_VALUE)
public Flux<String> streamChat() {
//构建prompt -> 发送到大模型 -> 获取大模型返回
//用户输入
String message = "在咖啡馆里,想要杯星巴克";
//链式调用
return this.chatClient
.prompt(message) //构建prompt
//.call() //发送到大模型
.stream() //以流式响应的方式和大模型进行交互
.content() //获取大模型文本返回
;
}
}6-6 SpringAi 1.1正式进入Agent自主决策时代ReactAgent
SpringAi Alibaba 1.1
- LLM 底层抽象
- ChatModel
- ChatClient
- 链式调用
- 流式响应(SSE协议)
- Graph
- Agent Framework
- ReActAgent组件
引入1.1的依赖
 <properties>
        <!--  SpringAi Alibaba 的版本号      -->
        <spring-ai-alibaba.version>1.1.0.0-RC2</spring-ai-alibaba.version>
</properties>
<dependencyManagement>
    <dependencies>
        <!--  SpringAi Alibaba 的 bom 版本管理        -->
        <dependency>
            <groupId>com.alibaba.cloud.ai</groupId>
            <artifactId>spring-ai-alibaba-bom</artifactId>
            <version>${spring-ai-alibaba.version}</version>
            <type>pom</type>
            <scope>import</scope>
        </dependency>
    </dependencies>
</dependencyManagement>

<dependencies>
    <dependency>
        <groupId>com.alibaba.cloud.ai</groupId>
        <artifactId>spring-ai-alibaba-agent-framework</artifactId>
    </dependency>
<!--
SpringAi Alibaba 的 bom 版本管理 里没有包含 spring-ai-alibaba-starter-dashscope
所以引入 spring-ai-alibaba-starter-dashscope
需要注明 spring-ai-alibaba-starter-dashscope 的版本号
-->
    <dependency>
        <groupId>com.alibaba.cloud.ai</groupId>
        <artifactId>spring-ai-alibaba-starter-dashscope</artifactId>
        <version>${spring-ai-alibaba.version}</version>
    </dependency>
</dependencies>SpringAi Alibaba 1.0 版本通过ChatClient对象 和 语言大模型进行交互 的方式,在 SpringAi Alibaba 1.1 版本 里同样适用。
SpringAi Alibaba 1.0 还处于和大模型对话阶段 ( ChatClinet )
SpringAi Alibaba 1.1进入到 Agent 自主决策与自主执行 的时代: ReActAgent 除了具备了大脑, 工具使用, 记忆能力,环境感知,还具备2个能力:规划能力 ( 复杂任务分解 )和自主决策能力
Agentic AI(智能体式AI): 多个 ReActAgent 的协调合作。是一种设计范式,强调将AI系统构建为具备自主性、适应性和协作能力的智能体集合。其核心目标是通过多Agent协同解决复杂问题
流式输出参考文档:https://java2ai.com/docs/frameworks/agent-framework/tutorials/agents/#流式输出 ,找到流式输出示例
@RestController
public class ReActAgentController {
    /**
     * description: 简单的流式响应
     */
    @GetMapping(value = "/simple/agent",produces = MediaType.TEXT_EVENT_STREAM_VALUE)
    public void streamChat() throws GraphRunnerException {
        //用户输入
        String message = "在咖啡馆里,想要杯星巴克";
        //工具方法
        ToolCallback weatherTool = FunctionToolCallback.builder("get_weather", new WeatherTool())
                .description("Get weather for a given city")
                .inputType(String.class)
                .build();
        // 创建 agent
        ReactAgent agent = ReactAgent.builder()
                // Agent的名称 (必须)
                .name("weather_agent")
                // Agent的大脑 (语言大模型)
                .model(chatModel)
                // Agent的手脚(调用工具)
                .tools(weatherTool)
                // Agent的眼睛和耳朵(RAG)
                //.hooks()
                // 系统提示词
                .systemPrompt("You are a helpful assistant")
                // Agent的记忆 (多轮对话)
                //.saver(new MemorySaver())
                .build();

        //一次性的回答返回
//        AssistantMessage assistantMessage = agent.call(message);
//        //获取回答
//        assistantMessage.getText();

        //流式返回
        Flux<NodeOutput> stream = agent.stream(message);
        stream.subscribe(
                output -> {
                    // 检查是否为 StreamingOutput 类型
                    if (output instanceof StreamingOutput streamingOutput) {
                        OutputType type = streamingOutput.getOutputType();
                        // 处理模型推理的流式输出
                        if (type == OutputType.AGENT_MODEL_STREAMING) {
                            // 流式增量内容,逐步显示
                            System.out.print(streamingOutput.message().getText());
                        } else if (type == OutputType.AGENT_MODEL_FINISHED) {
                            // 模型推理完成,可获取完整响应
                            System.out.println("\n模型输出完成");
                        }
                        // 处理工具调用完成(目前不支持 STREAMING)
                        if (type == OutputType.AGENT_TOOL_FINISHED) {
                            System.out.println("工具调用完成: " + output.node());
                        }

                        // 对于 Hook 节点,通常只关注完成事件(如果Hook没有有效输出可以忽略)
                        if (type == OutputType.AGENT_HOOK_FINISHED) {
                            System.out.println("Hook 执行完成: " + output.node());
                        }
                    }
                },
                error -> System.err.println("错误: " + error),
                () -> System.out.println("Agent 执行完成")
        );
    }
}工具方法
// 定义天气查询工具
public class WeatherTool implements BiFunction<String, ToolContext, String> {
    @Override
    public String apply(String city, ToolContext toolContext) {
        return "It's always sunny in " + city + "!";
    }
}多Agent协助MultiAgents
6-7 SpringAi 1.1组建旅游规划的Agent团队
创建费用统筹agent、路线制定agent、行程规划agent、主管agent。
@RestController
public class MultiAgentsController {

    @GetMapping(value = "/multi/agent",produces = MediaType.TEXT_EVENT_STREAM_VALUE)
    public void multiAgent() throws GraphRunnerException {
        // 费用统筹agent
        ReactAgent budgetAgent =
                ReactAgent.builder()
                        .name("budgetAgent")
                        .description("你是负责统筹旅游费用")
                        .tools()
                        .build();
        // 路线制定agent
        ReactAgent routeMakingAgent =
                ReactAgent.builder()
                        .name("routeMakingAgent")
                        .description("你是负责制定旅游出行路线")
                        // 将一个ReActAgent作为工具添加到另外一个ReActAgent
                        .tools(AgentTool.getFunctionToolCallback(budgetAgent))
                        .build();
        // 行程规划agent
        ReactAgent tripPlannerAgent =
                ReactAgent.builder()
                        .name("tripPlannerAgent")
                        .description("你是负责规划旅游行程")
                        // 将一个ReActAgent作为工具添加到另外一个ReActAgent
                        .tools(AgentTool.getFunctionToolCallback(budgetAgent))
                        .build();
        // 主管agent
        ReactAgent managerAgent =
                ReactAgent.builder()
                        .name("managerAgent")
                        .description("你是负责全局统筹旅游规划")
                        .tools()
                        .build();
    }
}6-8 SpringAi1.1 Agent团队协同合作
旅游规划Agent团队协同合作逻辑:
- 路线制定agent 和 行程规划agent 都嵌入了 费用统筹agent
- 路线制定agent 业务执行 和 行程规划agent 业务执行 没有业务依赖关系,是并行执行的业务
- 主管agent 负责业务分发的角色,将业务分发给相应的Agent
通过工作流Agent ( FlowAgent )将执行业务的Agent (ReActAgent) 按照流程逻辑串联起来
// ParallelAgent是工作流Agent,不是ReAct架构的Agent
//工作流Agent是将多个Agent按照流程逻辑组织起来
//ParallelAgent是多个Agent按照并行执行的流程逻辑进行协同
ParallelAgent parallelAgent =  ParallelAgent.builder()
        .name("parallelAgent")
        .description("路线制定和行程规划是并行执行")
        .subAgents(List.of(tripPlannerAgent,routeMakingAgent))
        .build();
//LlmRoutingAgent是工作流Agent,不是ReAct架构的Agent
//LlmRoutingAgent是让语言大模型动态的分发任务 (起到路由的作用)
LlmRoutingAgent llmRoutingAgent = LlmRoutingAgent.builder()
        .name("llmRoutingAgent")
        .description("将旅游出行工具选择的业务和旅游景点,住宿的规划业务分发给对应的智能体去执行")
        .subAgents(List.of(tripPlannerAgent,routeMakingAgent))
        .build();

//SequentialAgent是工作流Agent,不是ReAct架构的Agent
//SequentialAgent将多个Agent按照顺序的流程逻辑进行协同
//将路由Agent(llmRoutingAgent)以及并行Agent(parallelAgent)按照顺序流程逻辑串联起来
SequentialAgent sequentialAgent = SequentialAgent.builder()
        .name("sequentialAgent")
        .description("")
        .subAgents(List.of(llmRoutingAgent,parallelAgent))
        .build();
// 启动工作流
Optional<OverAllState> res = sequentialAgent.invoke("帮我规划深圳到惠州的3天旅游行程");6-9 AgentScope构建搭载工具的ReAct Agent
AgentScope Python:https://doc.agentscope.io/zh_CN/index.html
AgentScope Java : https://java.agentscope.io/zh/intro.html
一个面向智能体的编程框架,用于构建 LLM 驱动的应用程序。它提供了创建智能体所需的一切:ReAct 推理、工具调用、内存管理、多智能体协作等。
导入依赖
<properties>
    <!--   AgentScope     -->
    <AgentScope.version>1.0.7</AgentScope.version>
    <logback.version>1.5.25</logback.version>
    <jackson.version>2.20.1</jackson.version>
    <maven.compiler.source>17</maven.compiler.source>
    <maven.compiler.target>17</maven.compiler.target>
    <project.build.sourceEncoding>UTF-8</project.build.sourceEncoding>
</properties>
<dependencies>
    <!-- AgentScope all-in-one -->
    <dependency>
        <groupId>io.agentscope</groupId>
        <artifactId>agentscope</artifactId>
        <version>${AgentScope.version}</version>
        <!--    AgentScope 自身的依赖 jackson-databind 冲突,需要排除 -->
        <exclusions>
            <exclusion>
                <groupId>com.fasterxml.jackson.core</groupId>
                <artifactId>jackson-databind</artifactId>
            </exclusion>
        </exclusions>
    </dependency>
    <!--   实现slf4j接口,不然日志打印不出来    -->
    <dependency>
        <groupId>ch.qos.logback</groupId>
        <artifactId>logback-classic</artifactId>
        <version>${logback.version}</version>
    </dependency>
    <!--  将 jackson-databind 依赖版本统一, 这样就不会冲突     -->
    <dependency>
        <groupId>com.fasterxml.jackson.core</groupId>
        <artifactId>jackson-databind</artifactId>
        <version>${jackson.version}</version>
    </dependency>
</dependencies>AgentScope是以 Application形式 启动的不是通过web接口访问的
- SpringAi Alibaba 1.1 .model()的参数ChatModel对象
- AgentScope .model()的参数 Model 对象
DashScopeChatModel 实现了 Model 对象这个接口
- .formatter()的参数Formatter 接口
- AbstractBaseFormatter是实现了Formatter 接口
- DashScopeChatFormatter继承了AbstractBaseFormatter
public class HelloAgent {
    public static void main(String[] args) {
        //将阿里大模型平台(DashCope)的apikey放到Application的环境变量
        //获取Application环境变量的apikey
        String apiKey = System.getenv("DASHSCOPE_API_KEY");
        if (apiKey == null || apiKey.isEmpty()) {
            System.err.println("环境变量 DASHSCOPE_API_KEY 未设置");
            System.exit(1);
        }
        //创建工具包
        Toolkit toolkit = new Toolkit();
        //把工具添加到工具包,能自动扫描@Tool所注释的方法,作为Agent的工具
        toolkit.registerTool(new WeatherTool());
        ReActAgent agent =
                ReActAgent.builder()
                        .name("HelloAgent")
                        .description("AgentScope ReActAgent Hello World")
                        .model(DashScopeChatModel.builder()
                                //请求语言大模型的apikey
                                .apiKey(apiKey)
                                //所使用的语言大模型
                                .modelName("qwen3-max")
                                //是否开启思考模式
                                .enableThinking(true)
                                //是否流式返回结果
                                .stream(true)
                                //返回结果的格式化
                                .formatter(new DashScopeChatFormatter())
                                .build())
                  //配置工具包:
                  // SpringAi Alibaba 1.1 配置工具使用.tools(),AgentScope 配置工具使用.toolkit()
                        .toolkit(toolkit)
                        .sysPrompt(
                           """
                           你是一个AI助手。
                           """
                      )
                        //赋予Agent记忆能力
                        .memory(new InMemoryMemory())
                        .build();
        System.out.println("############ 等待响应...\n");
        //运行Agent
        agent.stream(
                //Prompt
                Msg.builder()
                        //消息角色
                        .role(MsgRole.USER)
                        //消息内容 (Prompt)
                        .content(List.of(
                                TextBlock.builder()
                                        .text("你好!")
                                        .build()
                        ))
                        // 消息内容 (发送文字形式的Prompt )
                        //.textContent("")
                        .build()
                    )
                //把响应结打印出来
                .doOnNext(msg->System.out.println(msg.getMessage().getTextContent()))
                //阻塞直到结束
                .blockLast();
    }
}工具类
public class WeatherTool  {
    @Tool(name = "get_weather",description = "查询天气") // 天气查询工具
    public String getWeather(){
        return "深圳天气24度";
    }
}6-10 MCP客户端连接MCP服务端
复习前面将的MCP服务端配置。全局配置依赖(父工程):
<dependencies>
    <dependency>
        <groupId>org.springframework.ai</groupId>
        <artifactId>spring-ai-mcp</artifactId>
    </dependency>
</dependencies>服务端需要的依赖
<dependency>
    <groupId>org.springframework.ai</groupId>
    <artifactId>spring-ai-starter-mcp-server-webflux</artifactId>
</dependency>然后定义一些XXTool,配置文件,注册工具
@Component
public class WeatherTool {
    @Tool(description = "获取指定城市当前时间的温度")
    public String getTemperature(@ToolParam String cityName) {
        return  cityName    + "温度值是30度";
    }
    @Tool(description = "获取指定城市的紫外线值")
    public String getUltraviolet(@ToolParam String cityName) {
        return cityName + "紫外线值:";
    }
}

@Configuration
public class ToolsRegister {
    @Bean
    public ToolCallbackProvider toolList(WeatherTool weatherTool) {
        return MethodToolCallbackProvider.builder().toolObjects(weatherTool).build();
    }
}spring:
ai:
mcp:
server:
# MCP服务器名称
name: imooc-weather-mcp-server
version: 0.0.1
type: SYNC
# MCP服务器的地址
# JManus导入MCP服务器,如果是使用SSE协议,地址必须包含/sse/
sse-message-endpoint: /mcp/sse/weather在客户端的父工程一样,客户端依赖
<!--   基于SpringBoot 的Webflux 框架 实现MCP 客户端的 SSE 协议    -->
<dependency>
    <groupId>org.springframework.ai</groupId>
    <artifactId>spring-ai-starter-mcp-client-webflux</artifactId>
</dependency>客户端配置mcp的服务端地址
spring:
  ai:
## 这里要启动 MCP Server, 才能打开以下注释, 否则会报错
#     MCP 客户端
    mcp:
      client:
        sse:
          connections:
            # MCP 服务端的名称
            imooc-weather-mcp-server:
              url: http://localhost:8081
       # 必须添加以下配置
        toolcallback:
enabled: true6-11 大模型调用本地自定义的MCP服务
此时客户端连接使用上了服务端的mcp服务
@RestController
public class ChatController {

      private final ChatClient chatClient;
      public ChatController(ChatModel chatModel,ChatClient.Builder chatClient,
            ToolCallbackProvider toolCallbackProvider) {
        this.chatModel = chatModel;
        this.chatClient = chatClient.defaultToolCallbacks(toolCallbackProvider).build();
      }

    /**
     * description: 询问大模型拥有哪些本地MCP服务端的工具
     */
    @GetMapping("/mcp/weather/")
    String generation(
            @RequestParam(value = "message",defaultValue = "你有什么工具")
            String message
    ) {
        return this.chatClient
                .prompt(message)
                .call()
                .content();
    }
}6-12 RAG只是一个过渡阶段吗
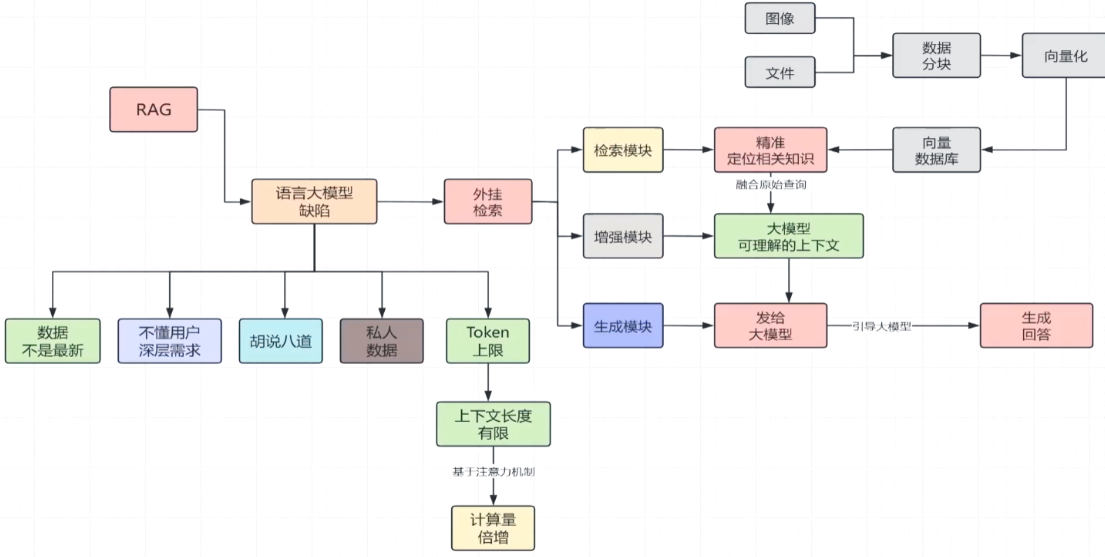
但是现在随着语言大模型的发展,看一下数据它是不是最新。你试一下在豆包或者deepseek或者千问那里去问一下现在天气是多少。那么语言大模型它肯定给出来现在的天气温度。所以说语言大模型数据不是最新的,这个缺陷已经不存在了。
随着语言大模型越来越智能,它的参数越来越多的情况下,用户的深层需求的挖掘,其实这个缺陷也是不存在的。胡说八道也就是我们所说的幻觉,这个缺陷是还存在。
语言大模型它肯定是获取不到私人数据,而且用户也不可能把自己的私人数据把它提交到语言大模型里面的。
6-13 长下文能取代RAG吗
文件需要经过一个数据清洗以及数据标注,然后还要进行数据的分块。而这里的分块它是有根据不同的分片方式来可以进行不同的分块的。而不同的分片的方式它会决定了数据分块的质量,这是第二步。 第三步就是数据分块之后还要进行向量化。 这里会涉及到向量化的处理,最后才存入到向量数据库里面。但查询这个向量数据库它又要经过几步。它首先是向量数据库,这里它会先进行一个查询,查询了之后还要进行召回,召回就是重新的一个筛选。 这里查询只是一个初步的筛选,这些相关的知识,然后再进行一个精确的筛选。这个就是召回生成了精确的筛选之后,来进行一个顺序的排列,最后才将这个相关的知识反馈给它。在查询的时候要经过这么几步。 所以你看虽然说weg它是能够精确的定位相关信息知识。
- 一个节点会跟随着这个链路一直去流动,甚至会将这个错误进行放大,这是第一个缺陷。
- 第二个缺陷就是文件,这些数据并不是直接的存入到向量数据库里面的,要进行数据的分块。刚才都说了分块不同的方式,它是能够决定了这个分块的质量。 所以说这里的分块它是过于机械化。你怎么知道如何去进行分块呢? 整个文章它的它有一个前文后理的,你怎么知道从哪里进行一个切分呢?你只是将某一种分块切分的方式,将它全部的一刀切的这样子应用到所有的文件。
最重要的,就是个性化的数据,还有就是多元的异构数据。这些异构数据包括了音频结构化的数据,非结构化的数据,这些也是不可能一股脑的全部发送给语言大模型,语言大模型也处理不过来。 需要RAG
近期语言大模型它怎么样发展也取代不了RAG这两个优胜的地方。所以我自己觉得RAG它应该不会被取代,但是RAG需要持续的进化,所有不要把RAG作为一个重要的知识。
6-14 测试AgentScope的Agent运行
启动测试